Our goal with this article is to walk you through the configuration for Windows 7. We’ll cover Windows XP today as well. However, we do not support or suggest using Windows Vista for Mac file sharing… it requires modification of registry files and is generally unstable. We actually recommend upgrading to Windows 7. Yes, that requires an additional purchase, but you’ll end up thanking us for more than a VPN connection. You’ll also have more speed, stability and future-proof-ability.
Let’s get to the fun stuff:
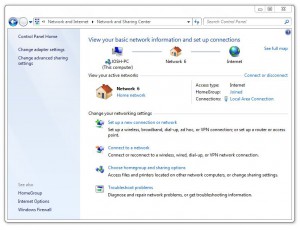
- Open the Network and Sharing Center
- You can get there from the Start Menu by clicking Control Panel, then Network and Internet, then finally Network and Sharing Center
- Click “Setup a new connection or network”
- It’s about halfway down the window under the “Change your network settings” section
- Click “Connect to a workplace”
- Click “Use my internet connection”
- Type the server’s domain or Public IP Address into the “Internet Address” field
- This is defined by your server administrator (If you’re one of our clients, we set this up for you), so check with them if you don’t know what to put here
- The “Destination Name” can be whatever you’d like: your company name is usually a good choice
- Don’t check any of the boxes at the bottom of that window
- Click next
- Enter the username and password of the user who’s connecting
- You can choose whether or not to remember the password depending on your security concerns
- Don’t put anything into the “Domain” field
- Click connect
- It will take a minute to make the connection since it tries L2TP before PPTP
- Once it says “You’re Connected,” go ahead and close the window
- Continue with the rest of the steps below or you may not be able to browse the internet and be connected to the file share at the same time
- Now, click your network icon in the system tray
- Right click the new VPN connection and then click “Properties”
- Click to the Security tab
- Click the “Type of VPN” drop down menu and change it from “Automatic” to “Point to Point Tunneling Protocol (PPTP)”
- This will prevent Windows from searching for other connection types and force it to use PPTP, speeding up the process
- Click to the Networking tab
- Highlight “Internet Protocol Version 4 (TCP/IPv4)”
- Click the “Properties” button then click the “Advanced” button
- Uncheck the “Use default gateway on the remote network” checkbox
- Click the okay button, click the next okay button, and then click the final okay button
- You should now disconnect from the VPN and reconnect to it
- It will prompt you to “redial” the connection so it can connect using the new settings
- That’s why you have to disconnect and reconnect
Now that we have the VPN configured properly, we can talk about mapping a network drive (Mac users call it a share point) so you can access the files on your server. This process isn’t exactly universal — it depends heavily on the name and configuration of your share points — but we’ll still walk you through the basic configuration.
- Open the “Computer” Folder
- You can find it in the right column of the Start Menu
- Click the “Map a network drive” button near the top of that window
- Click the “Drive” drop down menu and choose a letter for your network drive
- In the “Folder” field, type this: Server NameFileShare
- If there’s a space in the names, enter it — if not, don’t — Windows should find it just fine
- If you’d prefer to use the server’s internal IP address, you can do that instead of the server name
- Check both checkboxes underneath the folder field then click Finish
- If you’re concerned about security, you can leave “Reconnect at logon” unchecked, it’s just easier to maintain connectivity if you check that box
- We chose “Connect using different credentials” because the username on the server and the username on your PC probably do not match.
- When the “Enter Network Password” prompt appears, click “Use another account”
- Enter your username and password for the server
- Check the box for “Remember My Credentials”
- Again, if you’re concerned about security, don’t check it
- Click the “Okay” button
- It will then find the network share and map it to the drive letter you defined
- If it doesn’t connect, make sure that your username and password are correct
- Also make sure that you typed the server name and file share name correctly
That’s it! You should be talking to the Mac server from your Windows 7 PC via VPN and the mapped network drive. Depending on your chosen settings, it will reconnect every time you restart or connect to the VPN. We don’t usually keep the VPN connected unless we need to access the file shares and would recommend you do the same.
If those instructions are a bit overwhelming (they were to me) then just give us a call and we’ll work with you to get everything connected. If you have any questions, or something we wrote doesn’t make sense, just leave us a comment and we’ll get back to you shortly. Thanks for reading!